352-804-2056

Updates That
Gain Space
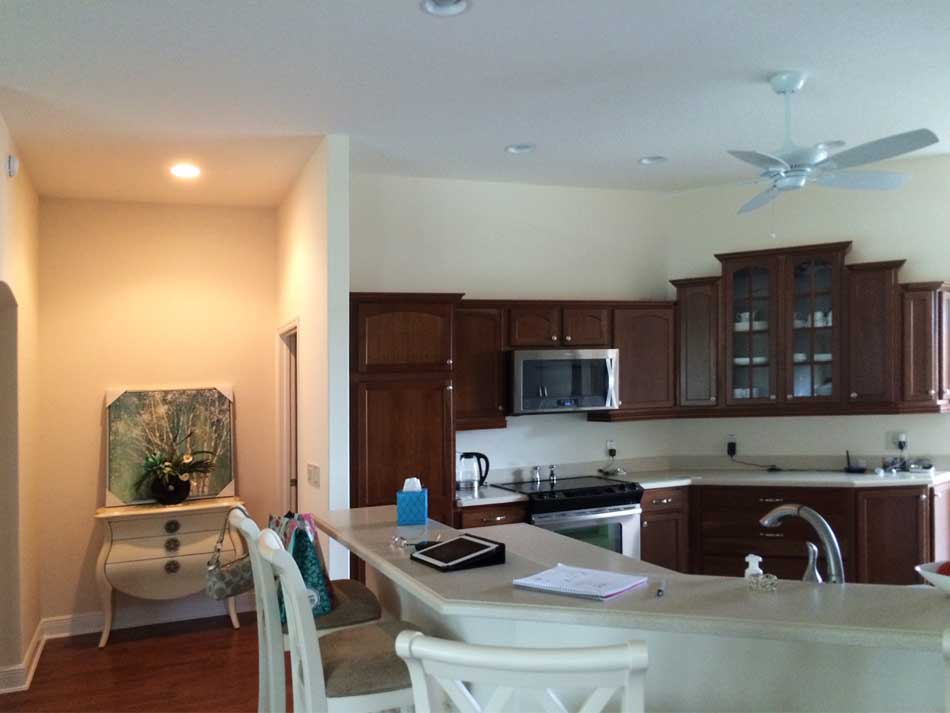
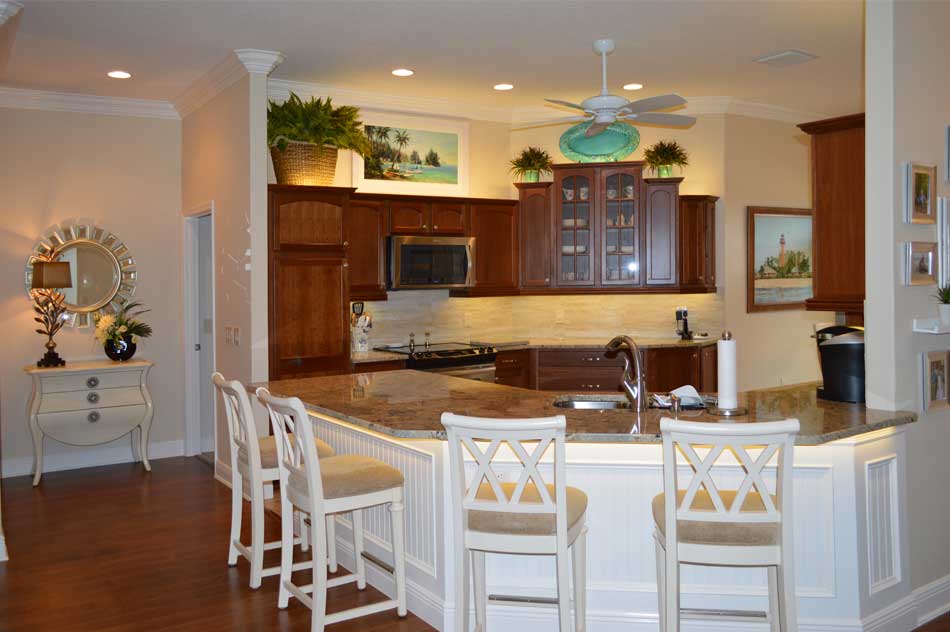
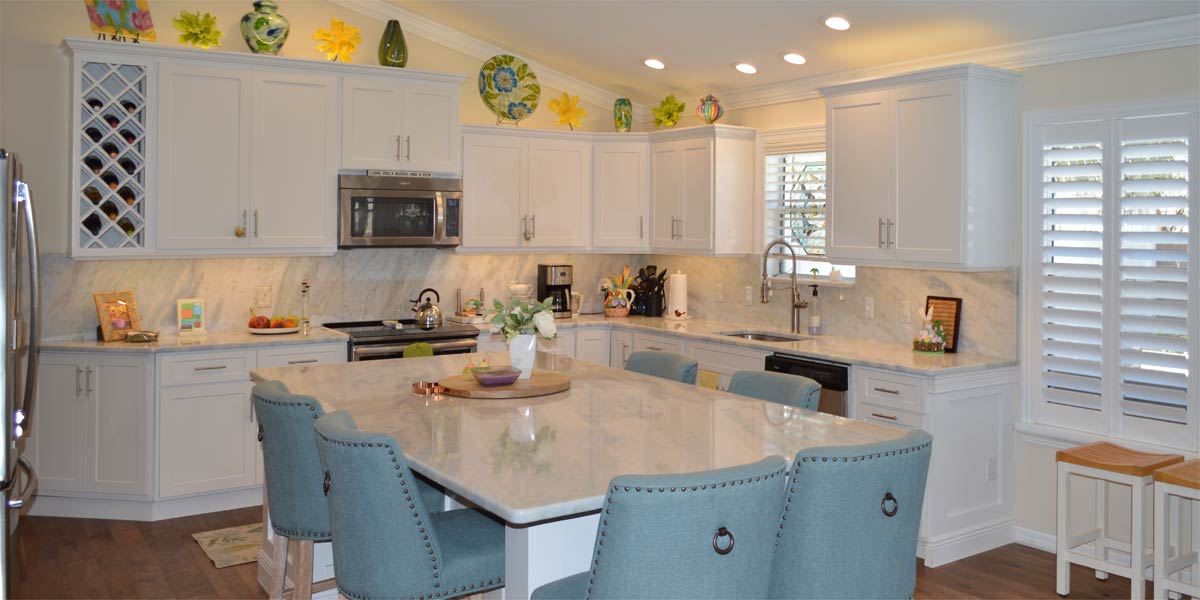
Kitchen updates can be tricky because it is hard to decide what to tackle and why to tackle it. Recognizing what is needed to update the kitchen and spending the money in the right place is challenging. If we focus on the big picture we will get the most visual bang for the buck. Several weeks ago we looked at a kitchen with tan cabinetry and green granite. In that kitchen we kept the granite and re-faced the kitchen in white. The new white cabinets made the granite look new and fresh while saving lots of money. Conversely in this week’s kitchen we need to make some changes but not with the cabinetry. Let’s take a peek into the kitchen of a Begonia model where the new granite provides lots of new space and visual bang for the buck, somewhere in the heart of The Villages.
• Cabinetry
I always ask the question, what do you see most in the space? In the kitchen it is the cabinets. The house is fairly new and the cabinets are multi-staged which already looks updated and the warm maple color looks very nice. The homeowner wanted the counter tops replaced with granite but she still wanted it to look light.
• Lower the island
The homeowner wanted more counter space and the feeling of an island rather than a bar. We had the bar cut down to counter top height, which is easy and inexpensive to have done. Once the wall was cut down, the new granite created a beautiful large island. The new large island is more functional as a gathering island for social occasions. If you are considering taking down the half wall, the electric outlets can be moved to the side of the island and the garbage disposal button is placed near the sink as a push button in the granite. Also, if you need power on the top of the island, electric outlets can be added that pop up out of the granite.
• New Granite
We found granite that looked light but still incorporated the brown tone of the cabinets and the cream tone of the floor tile. Often when lowering the island finding a slab large enough so that there is no seam is challenging. However, try to find one large enough because the look is well worth it! My customers always have a fifteen year seal placed on the granite. This seal does cost more but it will make sure that you have no worries with water or staining. This seal is very durable.
• Backsplash
I always advocate for a full granite backsplash because it is installed in one day and there is no grout to worry about later. Also, when the under counter lighting is on, the granite looks so shiny and rich. However, this homeowner wanted a tile backsplash and I like the one that we chose. The key to a great backsplash is to have it blend will with the granite. We used a creamy travertine and it looks really good with the granite.
• New kitchen sink
When updating your kitchen if you don’t have a trash pull out, we can install a pullout even in the smallest of kitchens. The way it can be done is to buy a single large sink and have the drain placed on one side either right or left. The plumber will re-orient the plumbing and garbage disposal to one side together. By moving the plumbing and garbage disposal, it leaves one side under the sink open to install a trash bin and maybe a recycle bin as well.
• Wainscot
In any model with an island, the island always looks good with wainscot. This wainscot was installed with bead board and looks really good supporting the new granite counter top. When the kitchen is white, the white wainscot adds another bright pop that really makes the island stand out and is very complementary to the granite. If the kitchen cabinets are dark, the white wainscot under the bar pops in contrast to the dark cabinetry and the contrast complements everything by adding light.
• Light
We added under cabinet lighting which looks amazing. The under cabinet lighting serves two purposes; the first being function so that you see better when preparing food because the light is in front of you. The second purpose is decorative. At night the kitchen looks really good with the low lights. We also had lighting installed under the bar for an added touch of light. It looks great!
• Bar stools
The bar stools were brand new and the homeowner worried that she would have to start over and re-spend money but she did not have too. We were able to cut the bar stools down to counter top height stools and they work like a charm. At two hundred plus for a chair, I think cutting them down for a total of one hundred dollars was very practical.
P.S. –Attention all club presidents!
We give free decorating seminars. It is lots of fun and very informative. Call and schedule your club today. Also, we are on-line check out our web-site at www.ruthdyer.com and you can always e-mail us at ruth@finishingtouchfl.com. Call Ruth your full service decorator at 352-804-2056.
Before and After Pics Below