Butterflies
I resisted the urge to throw it off my arm because it is such a rare occurrence that a large orange butterfly lands on your arm when you are planting butterfly bushes. I had just secured the third bush deep into the soil and was ready to cover the area in mulch when the butterfly made its appearance. The pungent odor of floral blooms and fresh pine mulch was a calling card to the five butterflies that showed up to the party. They seemed to dip and twirl in the air with excitement that a new playground was opening up just for them. My new orange friend moved from my arm to join the crowd checking out the new digs and I watched them play for a bit. Though I was standing in in the 95 degree Florida heat covered in dirt viewing my new butterfly garden I got the same feeling that I get when I see a lovely kitchen transformation.…..Butterflies.
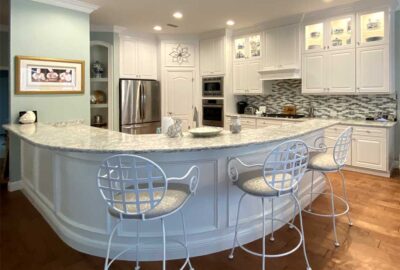
Let’s take a peek into the kitchen of a St. Augustine model and see what a transformation looks like when the homeowner decided she would never settle for anything less than butterflies, somewhere in the heart of The Villages.
• Pink ash oak cabinetry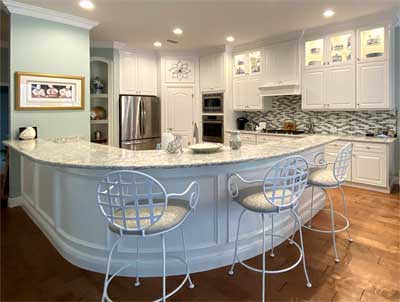
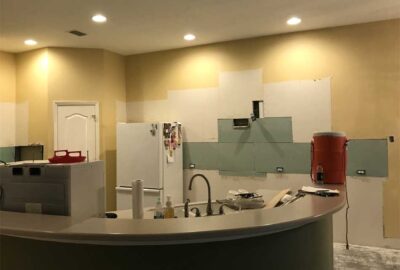
Back in the day pink ash oak cabinetry was all the rage! However, it is past its prime and will date your kitchen and your house if you do not change the cabinetry. The kitchen is the heart of every home and it is important to keep it updated. The homeowner wanted a white and bright kitchen with quartz that sparkled. Also the configuring of the kitchen needed improvement.
• Move the Refrigerator
The kitchen had a desk nook that the homeowner did not use and the homeowner did not like how far the refrigerator protruded into the space. The desk nook was deep enough to fully encapsulate the refrigerator there by minimizing the refrigerators size. It was easy to move the water line and “viola” the refrigerator was literally tucked away into its new home.
• Combined microwave and oven on one wall
The homeowner did not need a double oven but she did want the oven and the microwave stacked at easy to reach levels. They combined together into the space that was previously occupied by the refrigerator.
• Take the cabinets high
The previous cabinets were multilevel and the standard 30” height. We replaced those with cabinets that go all the way to the ceiling. Often, the question will be asked on kitchen consults, “Why do I want to make my cabinets higher when I can’t reach that high?” Raising the cabinets makes the kitchen look bigger by drawing the eye upward and adding verticality to the space. The tall upper cabinets can be used for long term storage and anytime you can increase storage you should. In this case, the homeowner wanted glass cabinets to display her blue and white pottery collection. The tall cabinets in this space also make the built in pantry look more like cabinetry rather than a drywall pantry. We added molding above the door to make the pantry blend in with the raised cabinetry. If you are considering a new kitchen take those upper cabinets as high as you can get them.
• Hood vent with storage
The hood vent is actually embedded in a cabinet. I like the seamless look of the large cabinet above the stove and I like that it is real storage.
• Add more cabinetry
The homeowner liked the idea of adding more cabinetry on the bottom cabinets and we were able to add more top and bottom cabinets. We were able to add an entire new top cabinet and we expanded the lower cabinet as well. This little addition yielded more storage and more countertop space which is always a win.
• Quartz
The homeowner had her heart set on grey and white quartz with just a hint of sparkle. The quartz added the right amount of color to the white kitchen and coordinated well with the glass back splash that also had coordinating sparkles.
• Wainscot on the island
The island in this kitchen is large and it is curved but that did not stop us from adding wainscot. The trim molding vendor installed custom flexi molding to create the same effect that we would have on a straight island. Remember, anything can have molding applied even if it has a curve thanks to flexi-molding. The wainscot was painted completely in white to visually coordinate with the kitchen.
• Lighting
We changed all the old lighting to the new LED integrated lighting. These are great because they are bright with a super long life. Also, they have a covering so you are not looking up at a flood light.
• Flooring
The homeowner had engineered hardwood installed throughout the entire house except the bathrooms. The engineered hardwood was beautiful warm maple that was not too dark and not too light. The entire home was installed and we did not have thresholds which is beautiful.
• Paint
The paint is from the fundamentally neutral line of paints and it is a green based blue. The color is called rain-washed and it complements all the warm wood on the floor and the all of the bright white kitchen.
P.S. –Attention all club presidents! We give free decorating seminars. It is lots of fun and very informative. Call and schedule your club today. Also, we are on-line check out our web-site at www.ruthdyer.com and you can always e-mail us at ruth@finishingtouchfl.com or Call Ruth your full service decorator at 352-804-2056.
